Skip to content
the gingerbread house blog
Menu
  • Home
  • About
    • About Me
    • Brand Ambassador
      • Adobe Photoshop Elements 2018
      • ASK Italian
      • Aquabeaders
      • Bahlsen Book Club
      • Bandai STEM Ambassador
      • Baker Ross Blogger Network
      • Blogger Board Game Club
      • Bostik Family Craft Bloggers Network
      • Build Your Own Brand Ambassador
      • Britax Mumbassador
      • Dunelm Mill Blogger
      • Friends of Sylvanian Families
      • Happy By Nature
      • Hasbro Toy Tribe
      • KDUK Mumbassadors
      • Lindam Munchkin blogger panel
      • Maped Helix Blogger Ambassador
      • Miffy Mums
      • Morphy Richards Innovator
      • Netflix Stream Team
      • Peppa Pig Holiday Blogger
      • Pinty Plus Ambassador
      • Playmobil Playologist
      • Quinny Caster
      • Sizzix
      • Staedtler Try It Tribe
      • Stamptastic Ambassador
      • Toys R Us Toyologist
      • Twinkl Blogger
      • UKMums.TV Preferred Blogger
    • 50 before 50 bucket list
    • Mailing list
    • Privacy Policy
  • Crafts
    • Crafts for Kids
      • Advent crafts
      • After school crafts
      • Apple Day crafts
      • April Fools’ Day
      • Back to school crafts
      • Bonfire Night crafts
      • Children In Need
      • Chinese New Year crafts
      • Christmas
      • Crochet
      • Dr Seuss Day craft
      • Duck Tape crafts
      • Earth Day crafts
      • Easter
      • Elf on the Shelf
      • Elmer Day
      • Fairy garden crafts
      • Fathers Day
      • Food crafts
      • Fourth of July crafts
      • Free printables
      • Garden crafts
      • Gingerbread
      • Gingerbread houses
      • Grinchmas crafts
      • Halloween
      • Handmade gifts
      • International Women’s Day
      • Kids crafts
      • London crafts
      • Lego crafts
      • May Day crafts
      • Minecraft crafts
      • Mother’s Day crafts
      • Nature crafts
      • New Year crafts
      • Painted rocks
      • Pancake Day crafts
      • Pokemon Day crafts
      • Recycled crafts
      • Roald Dahl crafts
      • Royal crafts
      • Sports crafts
      • Star Wars crafts
      • STEM activity
      • St George’s Day crafts
      • St Patrick’s Day crafts
      • Thanksgiving crafts
      • Toilet roll crafts
      • Tutorials
      • United Kingdom crafts
      • Upcycled crafts
      • Valentines Day crafts
      • Wizarding World crafts
      • World Bee Day
      • World Book Day ideas
      • World Otter Day
    • Crafts for Adults
      • Baking
      • Bento inspiration
      • Craft book reviews
      • Cricut Maker
      • Die cutting crafts
      • List of National Days and Awareness Days in the UK
      • Mollie Makes crafts
      • Paper cut art
      • Patchwork & Quilting
      • Pinty Plus projects
      • Sewing projects
      • Subscription box reviews
  • Family life
    • Charity shopping finds
    • Days out with the kids
      • Sculpture trails
    • Gift guides
    • Parenting tales
      • Siblings
    • What I’m reading
  • Travel
    • days out
    • Bedfordshire
    • Berkshire
    • Buckinghamshire
    • Cornwall
    • Devon
    • Dorset
    • East Sussex
    • Essex
    • France
    • Hampshire
    • Hertfordshire
    • Isle of Wight
    • Kent
    • London
      • Camden
      • City of London
      • City of Westminster
      • Harrow
      • Hillingdon
        • Ruislip
      • London Borough of Bexley
      • Haringey
      • London Borough of Kensington & Chelsea
      • London Borough of Richmond upon Thames
      • London Borough of Southwark
      • London Borough of Wandsworth
      • London Borough of Westminster
      • Southwark
      • Tower Hamlets
      • Wandsworth
    • Norfolk
    • Suffolk
    • Surrey
    • the Netherlands
    • Warwickshire
    • West Sussex
    • Wiltshire
    • National Trust
    • Sculpture trails
    • Local Review
Menu
DIY photo fridge magnets

DIY photo fridge magnets for a personalised Mother’s Day gift

Posted on March 8, 2018May 10, 2018 by jenny

We have a lot of photos on display in our house. We have a lovely photo wall where we like to display some of our favourite family photos. I love to use photos in my craft projects too, and with Mother’s Day coming up, I thought it would be fun to create fridge magnets as a personalised Mother’s Day gift.

We love to give handmade gifts throughout the year. Mother’s Day is a lovely date in our calendar and I would much rather receive a handmade card and gift than anything shop-bought. Follow my tutorial and you can see how to make fridge magnets as a personalised Mother’s Day gift.

This is a sponsored post on behalf of Adobe Photoshop Elements 2018

Equipment used

A selection of favourite family photographs, landscape orientation works best
Photoshop Elements 2018
Ink jet photo printer and photo paper
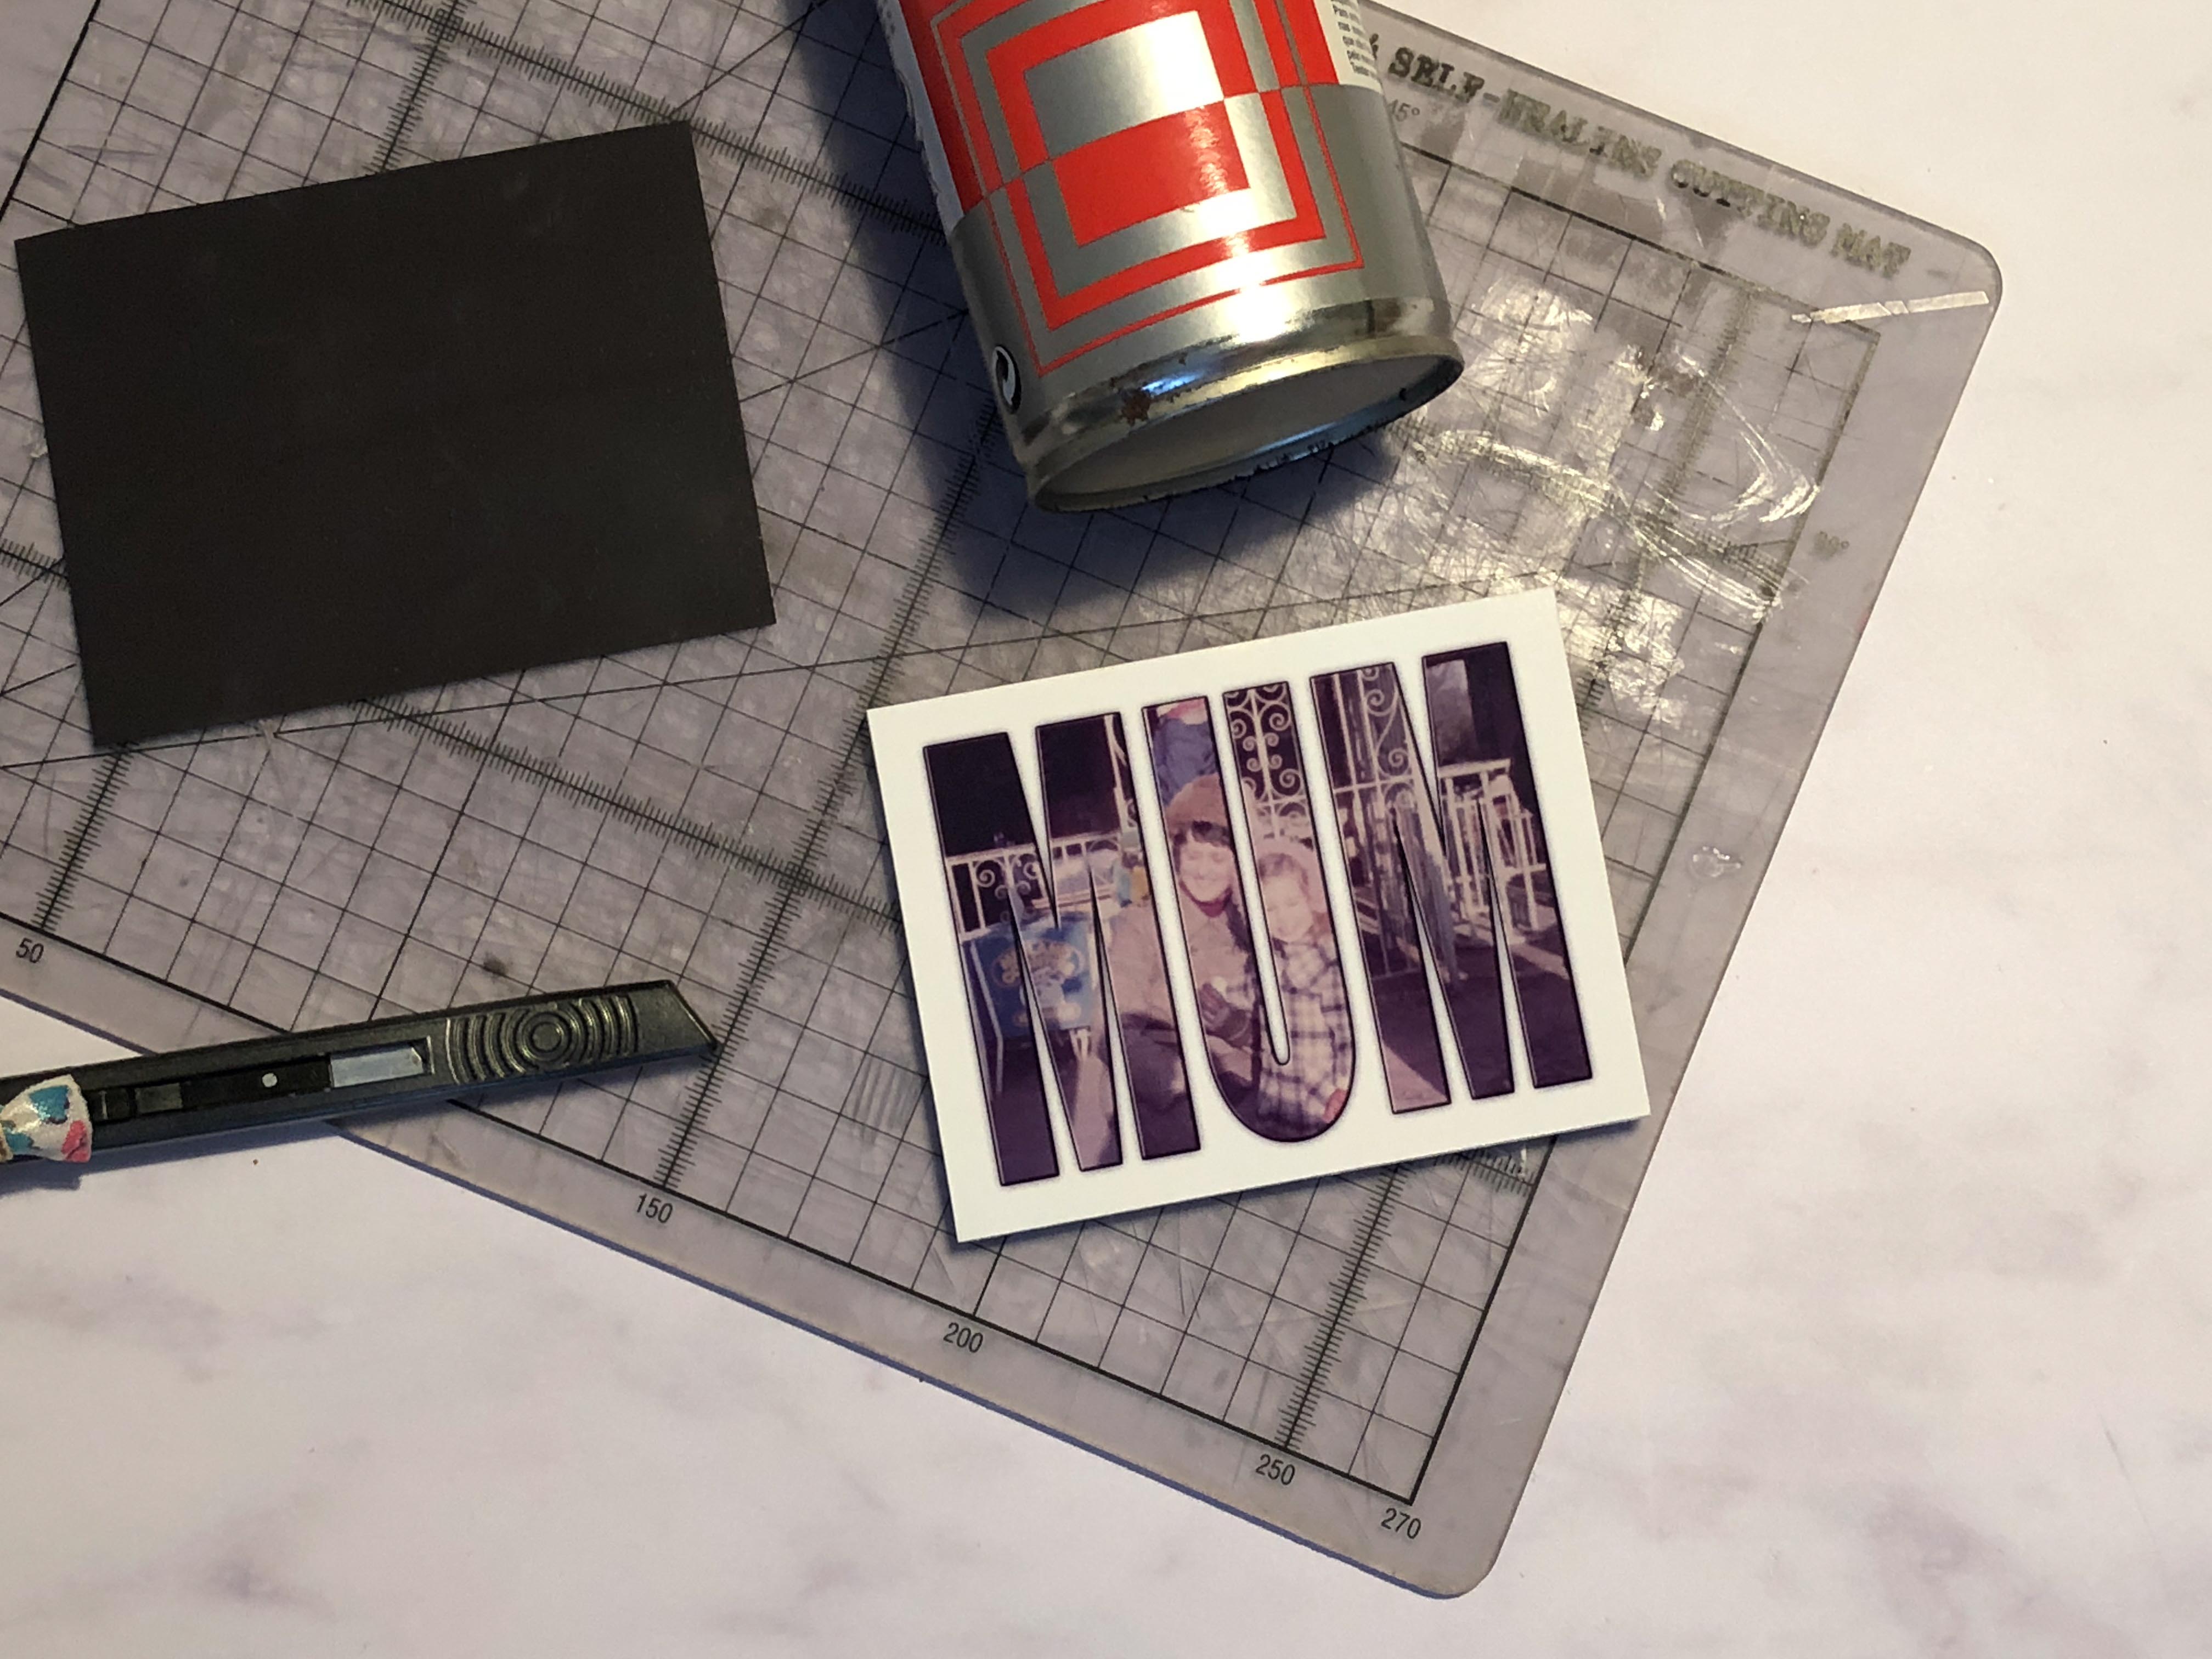
Cutting mat and craft knife
Magnet
3M Mount Spray

Mountboard

If you haven’t yet got a copy of Adobe Photoshop Elements 2018, don’t worry as you can get a free trial of the software for 30 days. It’s such a great way to get more from your photos.

How to create DIY photo fridge magnets

I spent some time choosing which photos to use. Sometimes I really want to work with a special photo but the end result isn’t what I expected. Photo selection is really important. For this project, you need plenty of space around faces, so landscape photos work best. I also found that bright photos with colourful clothing will stand out really well.

Here is the image I chose to turn into a fridge magnet.

I edited my chosen photographs in Photoshop Elements 2018 using Guided Edit – Fun Edit – Photo Text. This Guided Edit is brilliant as you can use it to turn your photo into fun visual text. Open your image in Photoshop Elements 2018 and open the Photo Text Guided Edit.

Photoshop tutorial step 1

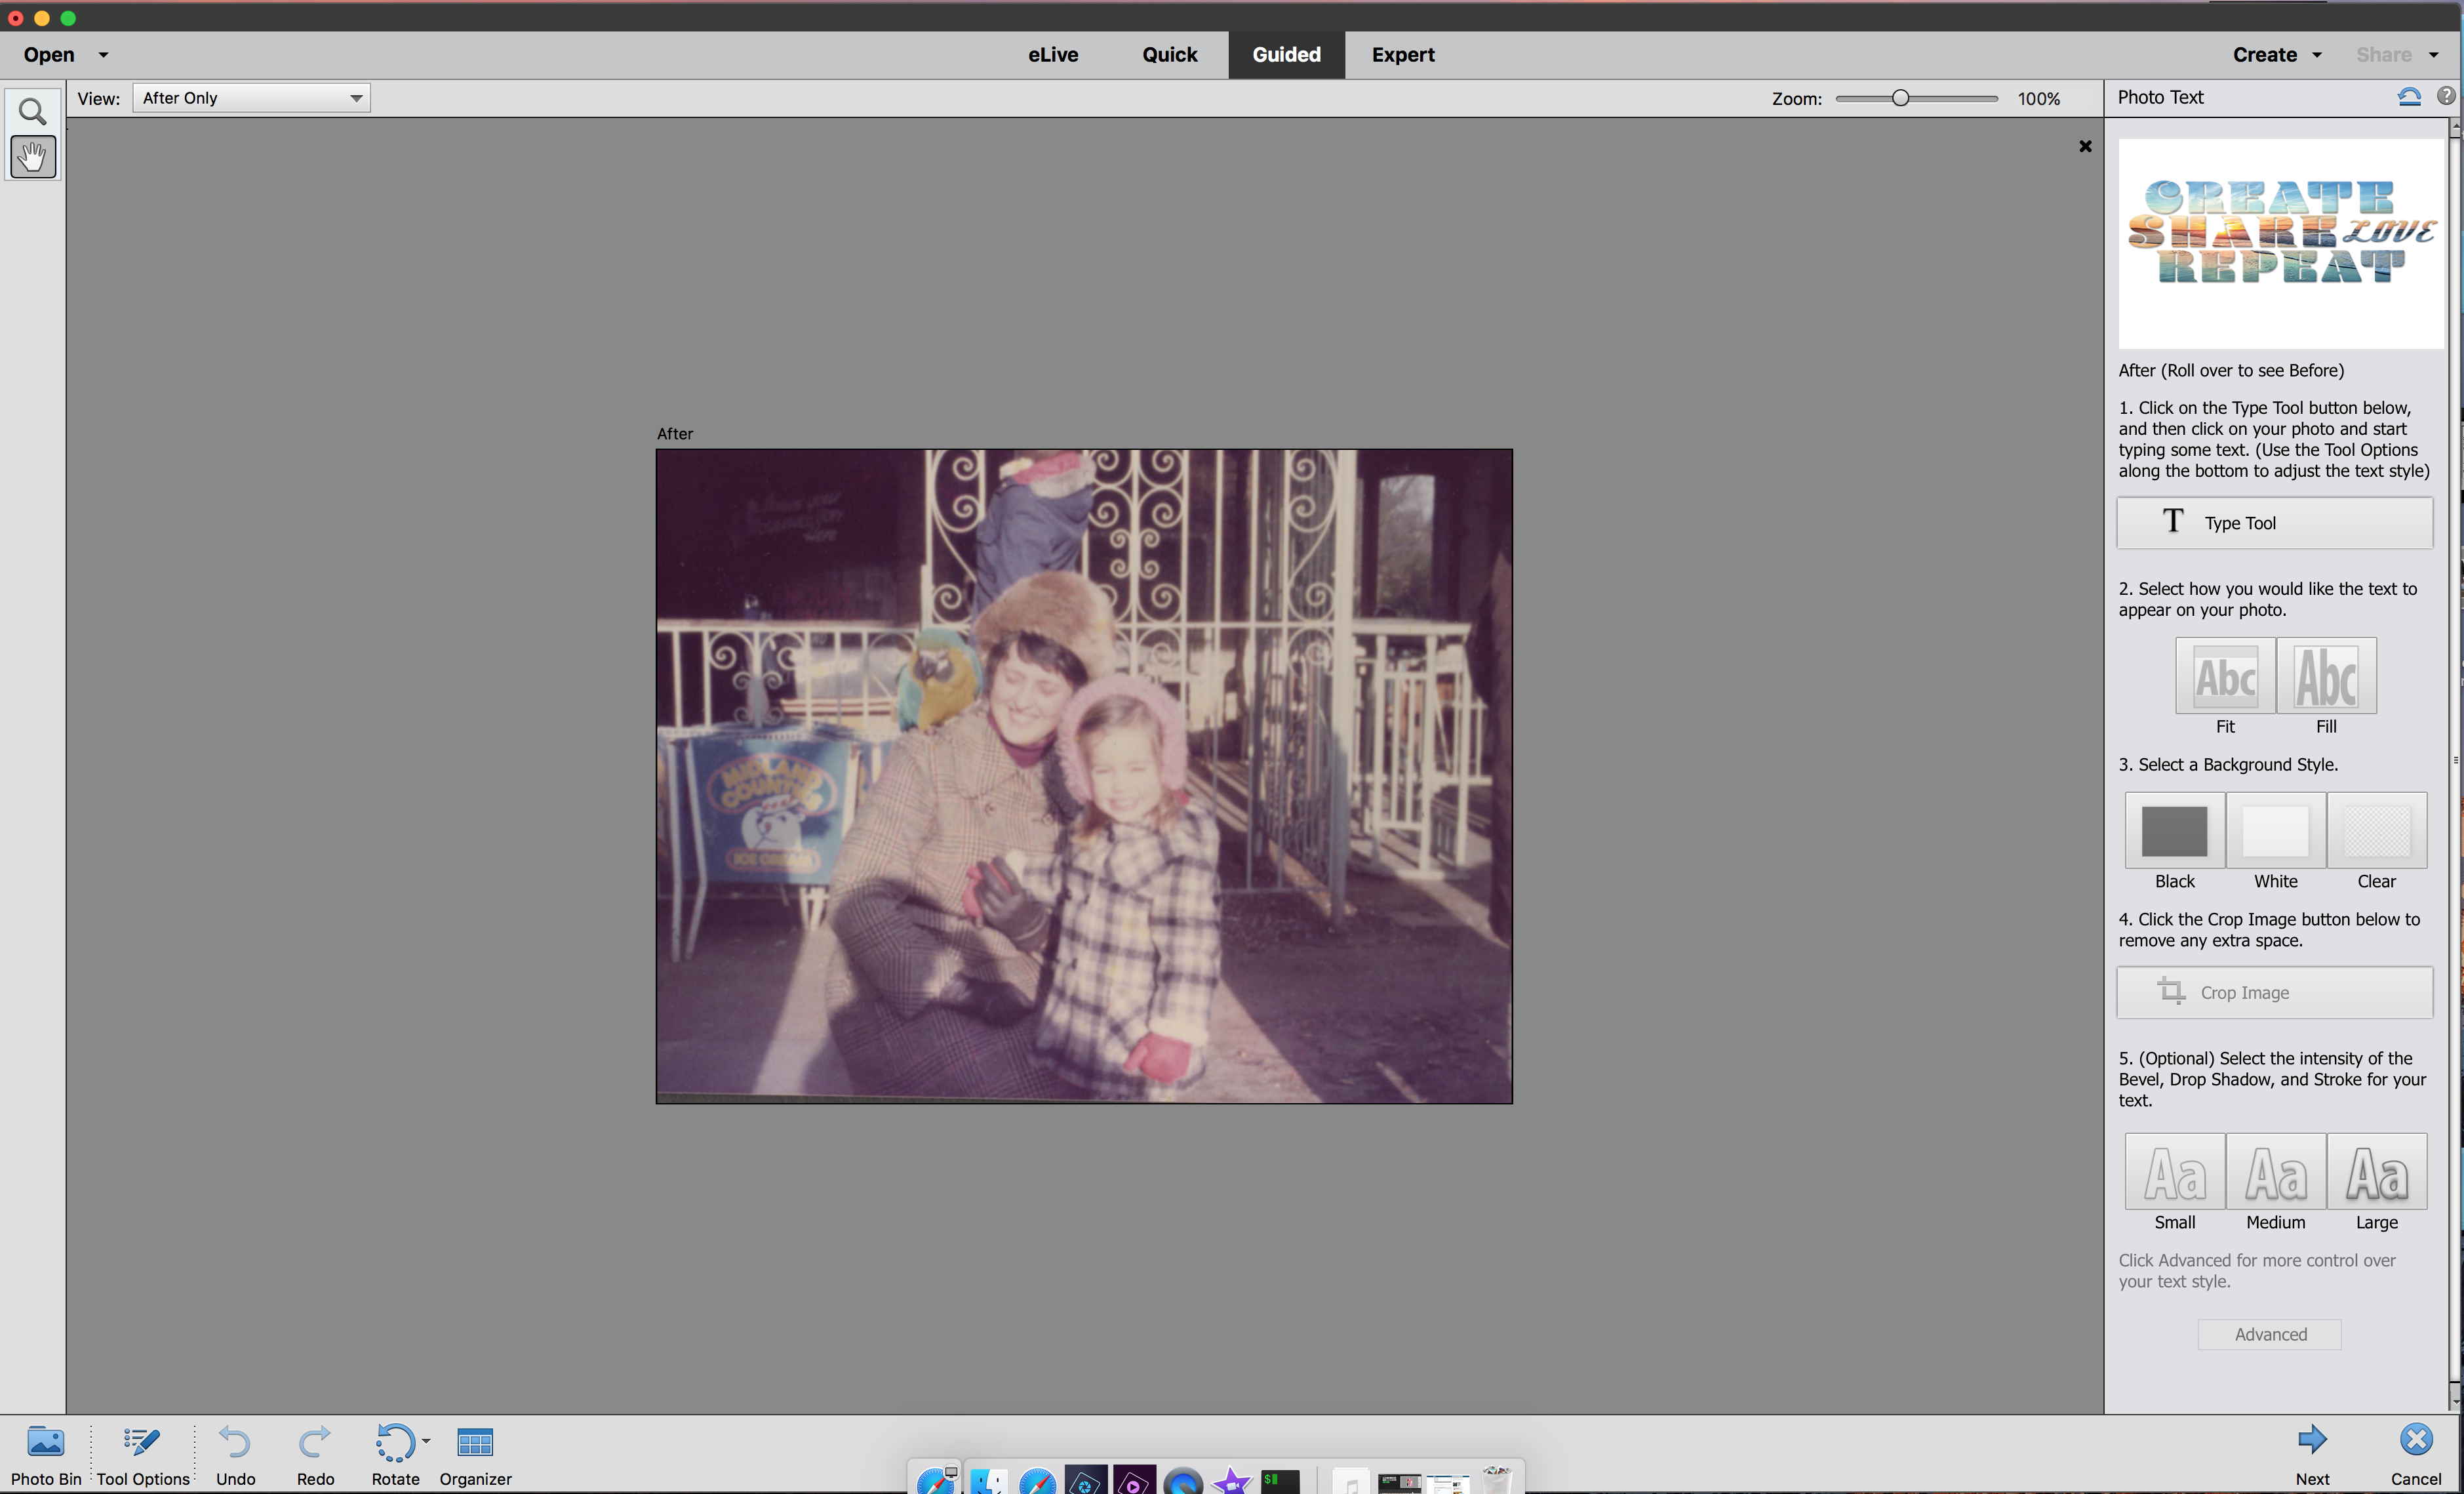
Click on the Type Tool button and then click on your photo and start typing. As this is a Mother’s Day craft, I typed the word MUM.

There are a number of Tool Options that appear at the bottom of the screen, which let you adjust the font and the size of the letters. If you want to type words on more than one line, you can adjust the space between them at this step. In my project I only wanted to use the one word so, when I finished typing, I clicked on the green tick to move on to the next step.

Next, I clicked and dragged on a corner of the box to adjust the size of my word. In my example I have used a photo of me and my mum. I wanted to make sure both our faces were in the box and not obscured by any of the letters, so I adjusted the box until I was happy. When I was happy with the way the words appeared over my image, I clicked on the green tick.

You can select whether you want the text to fit or fill the area you have selected. I chose Fill because I thought it looked more striking.

There are three background styles to choose from: black, white or clear. I preferred the white background as I’m printing on white photo paper, so I selected that option. At this stage, there is an option to crop your image, but I did not need to do this as there was no additional area to crop.

The final edit, which is optional, is to select the intensity of the bevel, drop shadow, and stroke around your text. There are 3 types to choose from: Small, Medium, and Large. I chose the Small option as I wanted to make the letters clear. As I was using the edited photo as a fridge magnet, I knew I would print it quite small, so I wanted the text to be readable.

As I mentioned, there are some Advanced options to adjust the bevel, drop shadow, and stroke, but I was happy with the Small option I had already selected so didn’t need to use these for this project.

I clicked Next to save my edited photo, changing the format of my photo to PNG as I wanted to use them in this blog tutorial.

Here is the edited photo.

You can see a short video of the steps I went through:

When I was happy with my edited photo, it was time to print them. I opened Create – Photo Prints and Local printer, selected Print Size (8.9×12.7cm), and printed them on our Ink Jet photo printer on to photo paper.

how to create fridge magnets

I cut away the spare photo paper, sprayed the back with 3M Photo Mount, and attached it to a piece of mountboard to make it sturdier. I used my cutting knife and mat to trim the edges.

create your own personalised magnets

I cut a piece of magnetic sheet slightly smaller than my mounted photo, and used more Photo Mount to attach them together.

create photo magnets

And my Mother’s Day photo magnet was ready to be placed on the fridge. You can leave out the mountboard and magnet and use the photo as a personalised bookmark too!

personalised photo fridge magnets

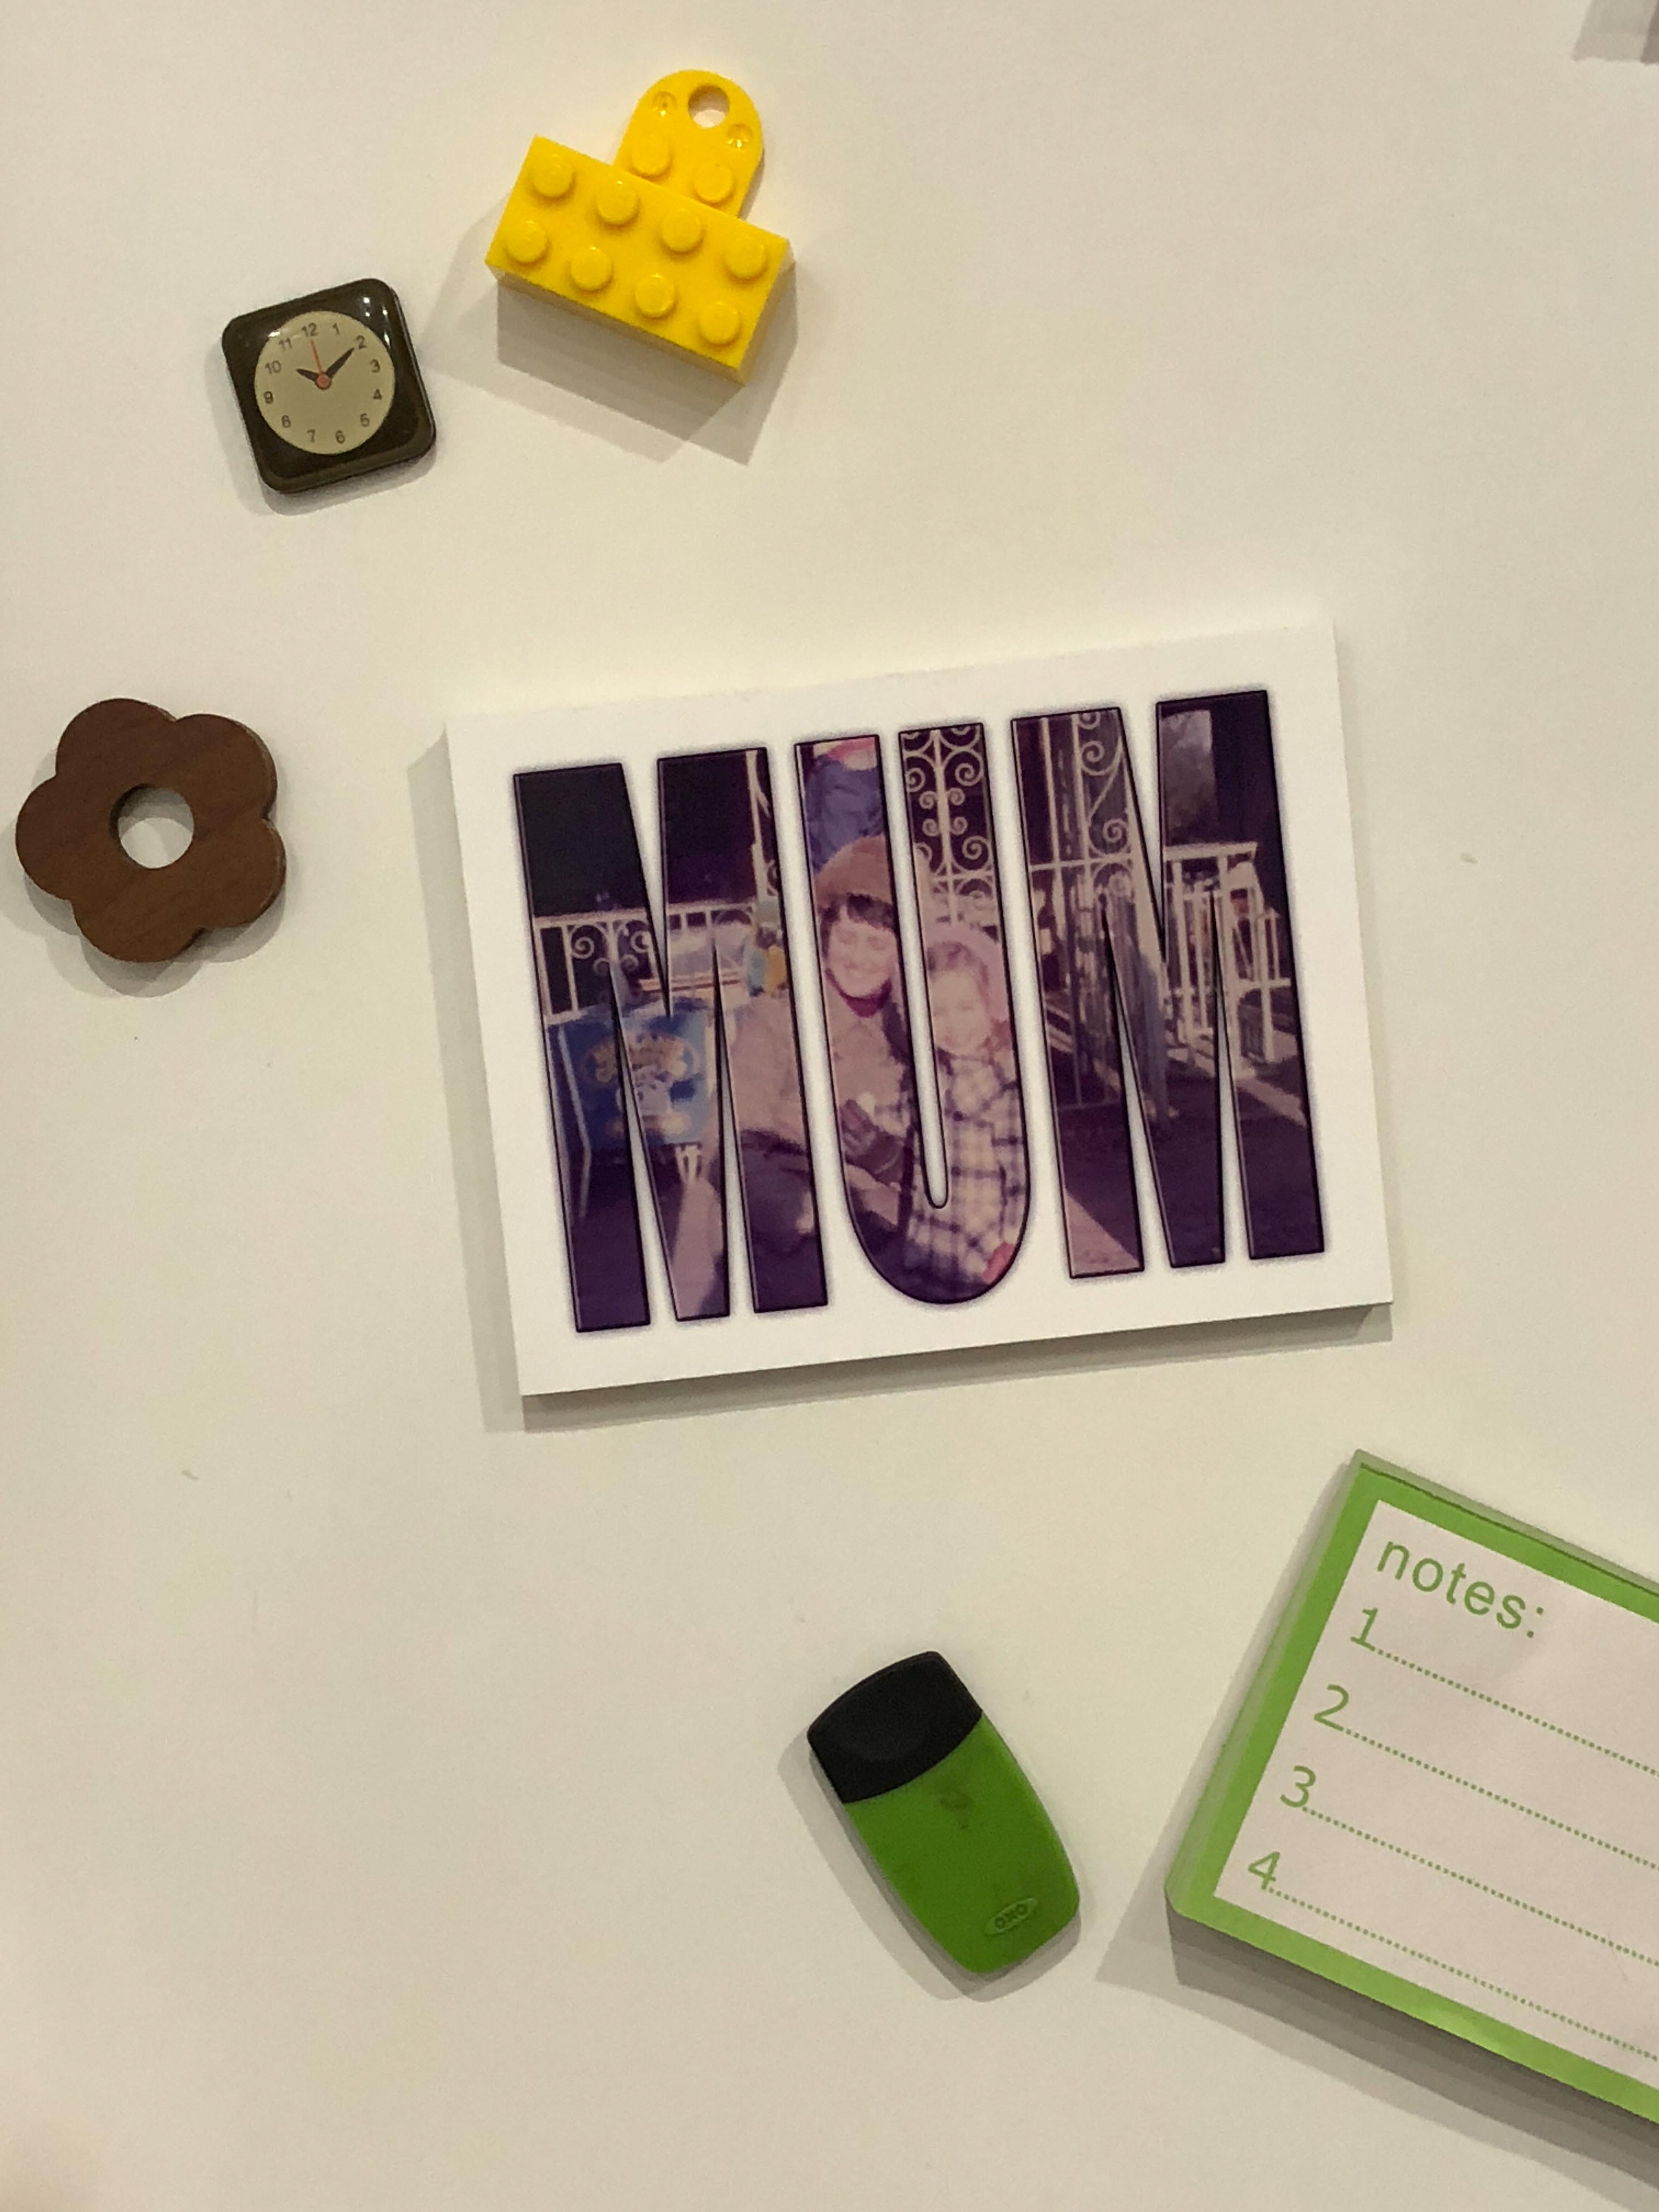
I think this makes a great handmade gift using a favourite family photo. You can also create mini letters as an alternative craft!

mini photo fridge magnets

The Guided Edits in Photoshop Elements 2018 make it easy to create something a bit different and I can’t wait to make some more. Do let me know if you try this craft at home.

Pin for later:

personalised photo magnets for a handmade Mothers Day gift

Related Posts:

  • Timeless Treasures: 5 Ways to Perpetuate Your Loved…
    dariusz-sankowski-mj2NwYH3wBA-unsplash
  • DIY cleaning solutions for personalised calendars
    brooke-lark-BRBjShcA8D4-unsplash
  • Easy resin personalised letters
    third layer of resin
Category: Adobe Partner, Crafts for adults, Mother's Day crafts

22 thoughts on “DIY photo fridge magnets for a personalised Mother’s Day gift”

  1. Starlight and Stories says:
    March 8, 2018 at 8:57 am

    Ooo I love using photoshop, but had never thought of doing this. I think I may have to experiment this afternoon.

    Reply
  2. Olivia Jade says:
    March 8, 2018 at 9:31 pm

    These look so good, I love using photoshop but I’ve never thought to use it in this way! Such a cool present 🙂

    Reply
    1. jenny says:
      March 9, 2018 at 8:41 am

      It’s amazing, it really helps you do so much with your photos.

      Reply
  3. Sarah says:
    March 8, 2018 at 10:05 pm

    What a gorgeous idea! You are so creative when it comes to using photoshop!

    Reply
    1. jenny says:
      March 9, 2018 at 8:40 am

      Thank you, it really helps me make the most of my photos.

      Reply
  4. Micaela says:
    March 8, 2018 at 10:39 pm

    I love this project! The way the image shows in the letters is just such a great effect. Homemade gifts are the best.

    Reply
    1. jenny says:
      March 9, 2018 at 8:40 am

      Thanks, it was so much fun to make.

      Reply
  5. Mellissa Williams says:
    March 9, 2018 at 12:17 pm

    What a lovely idea for a homemade Mother’s Day gift. Using Photoshop is a fab idea.

    Reply
  6. Kaz | Ickle Pickles Life and Travels says:
    March 9, 2018 at 7:50 pm

    I just love this idea – what a lovely Mother’s Day gift. Kaz

    Reply
  7. Anosa says:
    March 10, 2018 at 5:18 am

    This is such a super neat and cool idea, I too love personalised gifts more than store bought ones and the fridge magnet is lovely idea

    Reply
  8. Emma Raphael says:
    March 10, 2018 at 9:28 am

    That’s such a sweet idea. Not anything you would find in the shops either! 🙂

    Reply
  9. Jennifer says:
    March 10, 2018 at 2:31 pm

    This is such a fab idea! Just wish I was that creative.

    Reply
  10. Lynne Harper says:
    March 10, 2018 at 4:14 pm

    These are so clever I absolutely love the idea behind these I’m not very crafty but would definitely like to give something like this a try

    Reply
  11. Rachael says:
    March 10, 2018 at 5:55 pm

    Oh wow, these are incredible! I would absolutely love to receive these as a gift and knowing that so much thought and effort went into making them is lovely and makes them so special.

    Reply
  12. Katie says:
    March 12, 2018 at 6:18 pm

    That is a fabulous idea! I never would have thought to make something like this, so creative.

    Katie xoxo

    Reply
  13. Super Busy Mum says:
    March 12, 2018 at 6:38 pm

    These are super sweet gifts to make for Mothers day!

    Reply
  14. Jen says:
    March 13, 2018 at 7:12 pm

    Such a lovely idea, and easy to do yourself. Something like this can mean such a lot, and be such a treasure.

    Reply
  15. Pingback: The Ultimate List for Mother's Day - Sarah's Sage Advice
  16. Pingback: Beautiful DIY Gifts for Mother's Day - The Moments at Home
  17. Pingback: 13 Mother's Day DIY Gifts for That Special Lady! - The Quirky Mom Next Door
  18. Pingback: Free Mother's Day colouring page for kids - the-gingerbread-house.co.uk
  19. Pingback: {Free printable} Print and Colour Your Own Gift Box - the-gingerbread-house.co.uk

Leave a Reply Cancel reply

Your email address will not be published. Required fields are marked *

Welcome to the gingerbread house blog. I’m Jenny, London mum of two teens. Craft and family lifestyle blogger, occasional baker of gingerbread. Find out more about us, our latest crafts, and be inspired by our days out. Contact me jenny@the-gingerbread-house.co.uk

Search

Latest posts

  • Creating the Ultimate Summer Play Space June 18, 2026
  • The Weekly Edit {Week 24/2026} June 15, 2026
  • Tobio’s vs. Emily Lex: The Definitive Watercolor Guide June 14, 2026
  • Air-Dry Masterpieces by Hazel Brady {book review} June 13, 2026

2005-2026

Subscribe to our mailing list

* indicates required

Popular posts

As an Amazon Associate I earn from qualifying purchases.

All content strictly copyright Jenny 2005-2026

2026 Reading Challenge

2026 Reading Challenge
Jenny has read 0 books toward her goal of 24 books.
hide
0 of 24 (0%)
view books

We hope that you enjoy using our free printables. Please note these printables are for personal use only. Not for redistribution. All images are copyrighted.

© 2026 the-gingerbread-house.co.uk | Powered by Minimalist Blog WordPress Theme