
How To Get The Best Results When Using A Silicone Mould With Flower Paste
Have you ever seen a beautiful wedding cake that has delicate lace patterns on it and wondered just how the incredible effect  was achieved? Although most sugar-crafters would love to have the skill needed to achieve such a finish the simple fact is that such accuracy is achieved by using flower paste formed into shape in a silicone mould.
Using a mould allows incredibly fine and detailed shapes to be created using flower paste which would otherwise be impossible, or at least extremely difficult and time consuming, to achieve. But like all skills in baking and sugar-crafting, using silicone moulds takes time and practise. To help you, follow these tips.
Dust Your Mould
Before you begin be sure to give your mould a liberal dusting of icing sugar. Take a clean brush, dab it into the icing sugar 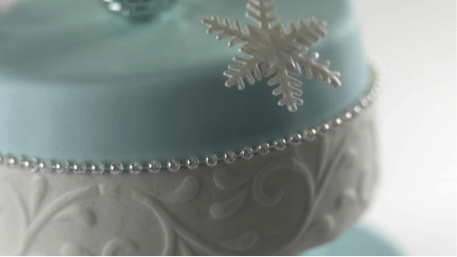 and make sure that all the surfaces are well covered. Give the back a tap to get rid of the excess and leave a smooth covering. This will ensure that your flower paste doesn’t cling to the mould when it comes time to remove it.
Take The Time To Knead Your Flower Paste Right
It’s important to get your flower paste to the right consistency. Knead the paste until it’s pliable, but make sure you don’t work it until cracks begin to appear. Then roll the flower paste out to the desired thickness. This will depend on your mould and also what look you want. You’ll generally want lace to be finer than flowers for example, but about 3mm is generally fine for most applications.
When rolling your flower paste out you can apply a light coating of icing sugar to the work surface to stop it sticking. It also helps to turn the paste occasionally as well while rolling.
Don’t Rush The Moulding
Gently lay your rolled out flower paste onto the mould and then begin working it into the pattern. Gently press the paste into  place and rub your fingers over it. You’ll find that the flower paste will slowly begin to take on the shape of the mould. Don’t rush this as you can easily tear things and have to start again. Make sure that you give special attention to the corners and edges of the pattern to ensure they are defined.
Taking the edge of you thumb push the excess flower paste away from the mould, which should remove everything leaving you with just the shape remaining. Push in any rough edges and smooth them into place to get a neat finish. Once you’re done flip the mould over and press the flower paste out. It should come out nice and easy thanks to the icing sugar.
These simple tips should help you achieve perfect results every time when using flower paste in a silicone mould and ensure your cakes look gorgeous every time.
Renshaw Baking’s flower paste has a unique recipe which ensures it creates the finest decorations, and it is also available in a range of exciting colours.


1 Comment
Melissa ❤ (@melissazia)
September 14, 2014 at 4:55 pmVery helpful tips, I love making cakes so will give this a go one day when I decided to start to mould.
Melissa x